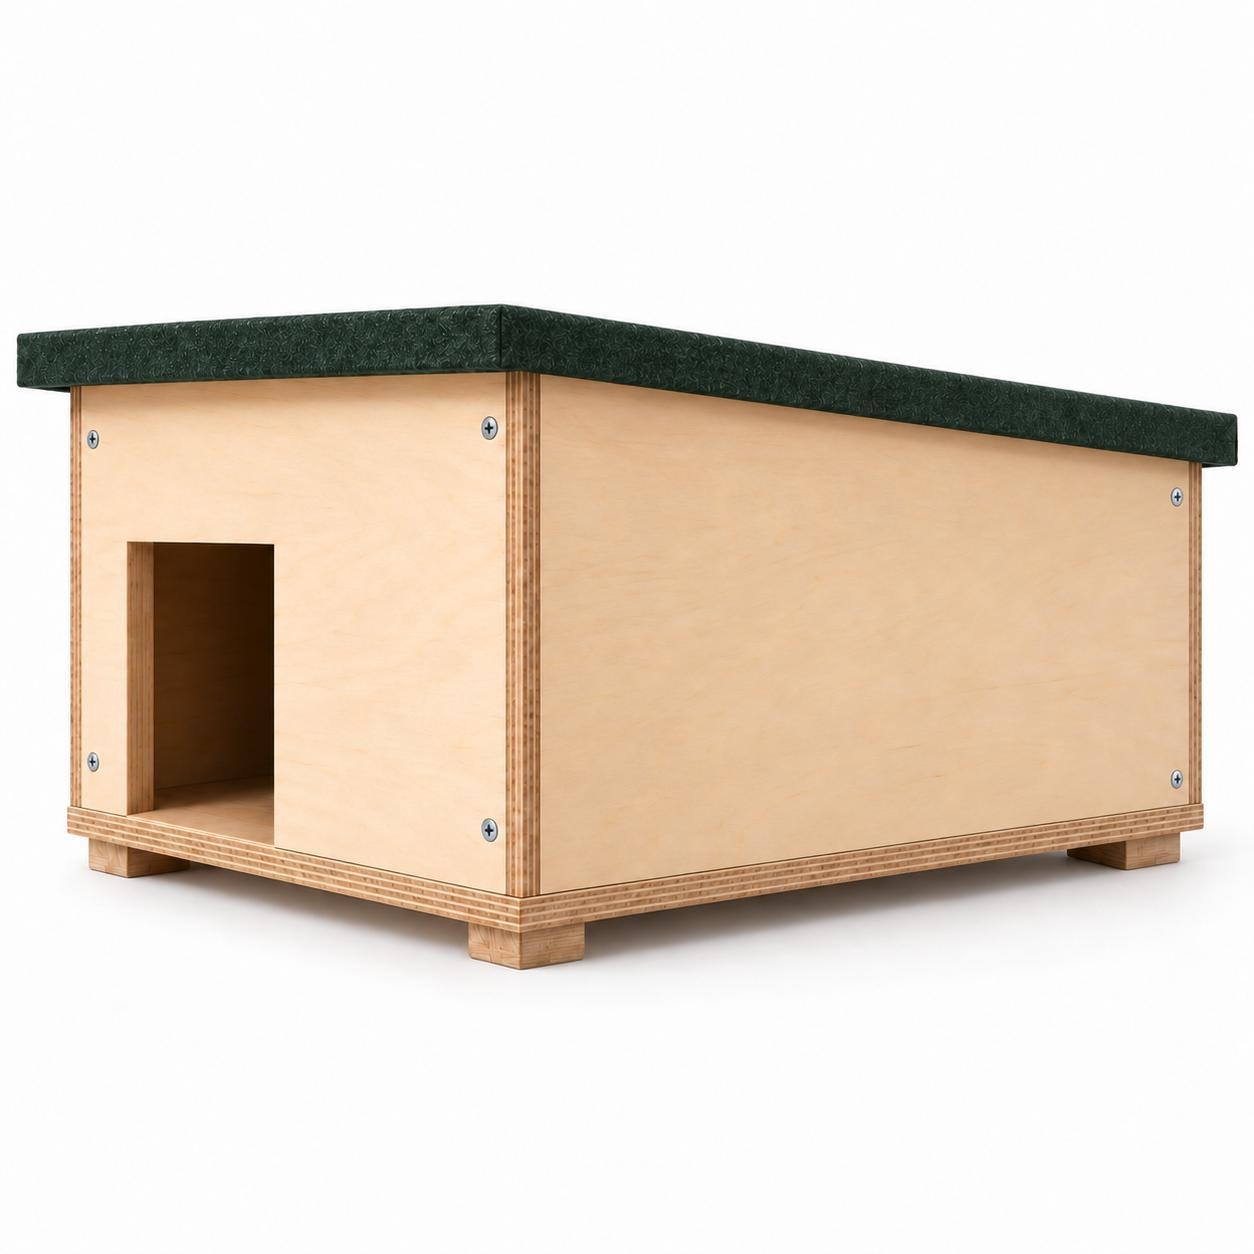
To build our wooden hedgehog house, cut the panels from one 1,220 × 1,220 × 18 mm sheet of untreated exterior-grade plywood, assemble a 500 × 400 mm body with an internal divider, and fit a removable roof that falls 30 mm from the entrance towards the back. The entrance leads around the divider into a separate sleeping area. Our free six-page plan gives you the labelled cut list, measured layout and assembly drawings to take into the workshop.
↓ Download the free GroundFeeders hedgehog house plans (PDF)
Before you cut: check the actual sheet thickness and your saw’s kerf. The sheet layout allows 3 mm for each saw cut and assumes 18 mm plywood. If either measurement differs, rework the layout and dry-fit the parts before fixing them. The drawings show the design, not a completed or field-tested house.
What makes this design different?
The 130 × 130 mm entrance opens at floor level. A 201 mm deep divider blocks a straight route into the larger sleeping area, so the animal moves along a compact passage and around the divider’s end. The roof lifts off for access only when the house is known to be empty. Two runners raise the floor slightly from the ground.
Hedgehog Street recommends an internal tunnel or dividing wall where a box has no external tunnel, and untreated wood for hedgehog homes. A house is an optional nest site alongside natural cover such as log piles and quiet, leafy corners; a good design cannot promise that a hedgehog will move in. For a quicker alternative, see our two-option hedgehog house guide.
Cut list and layout
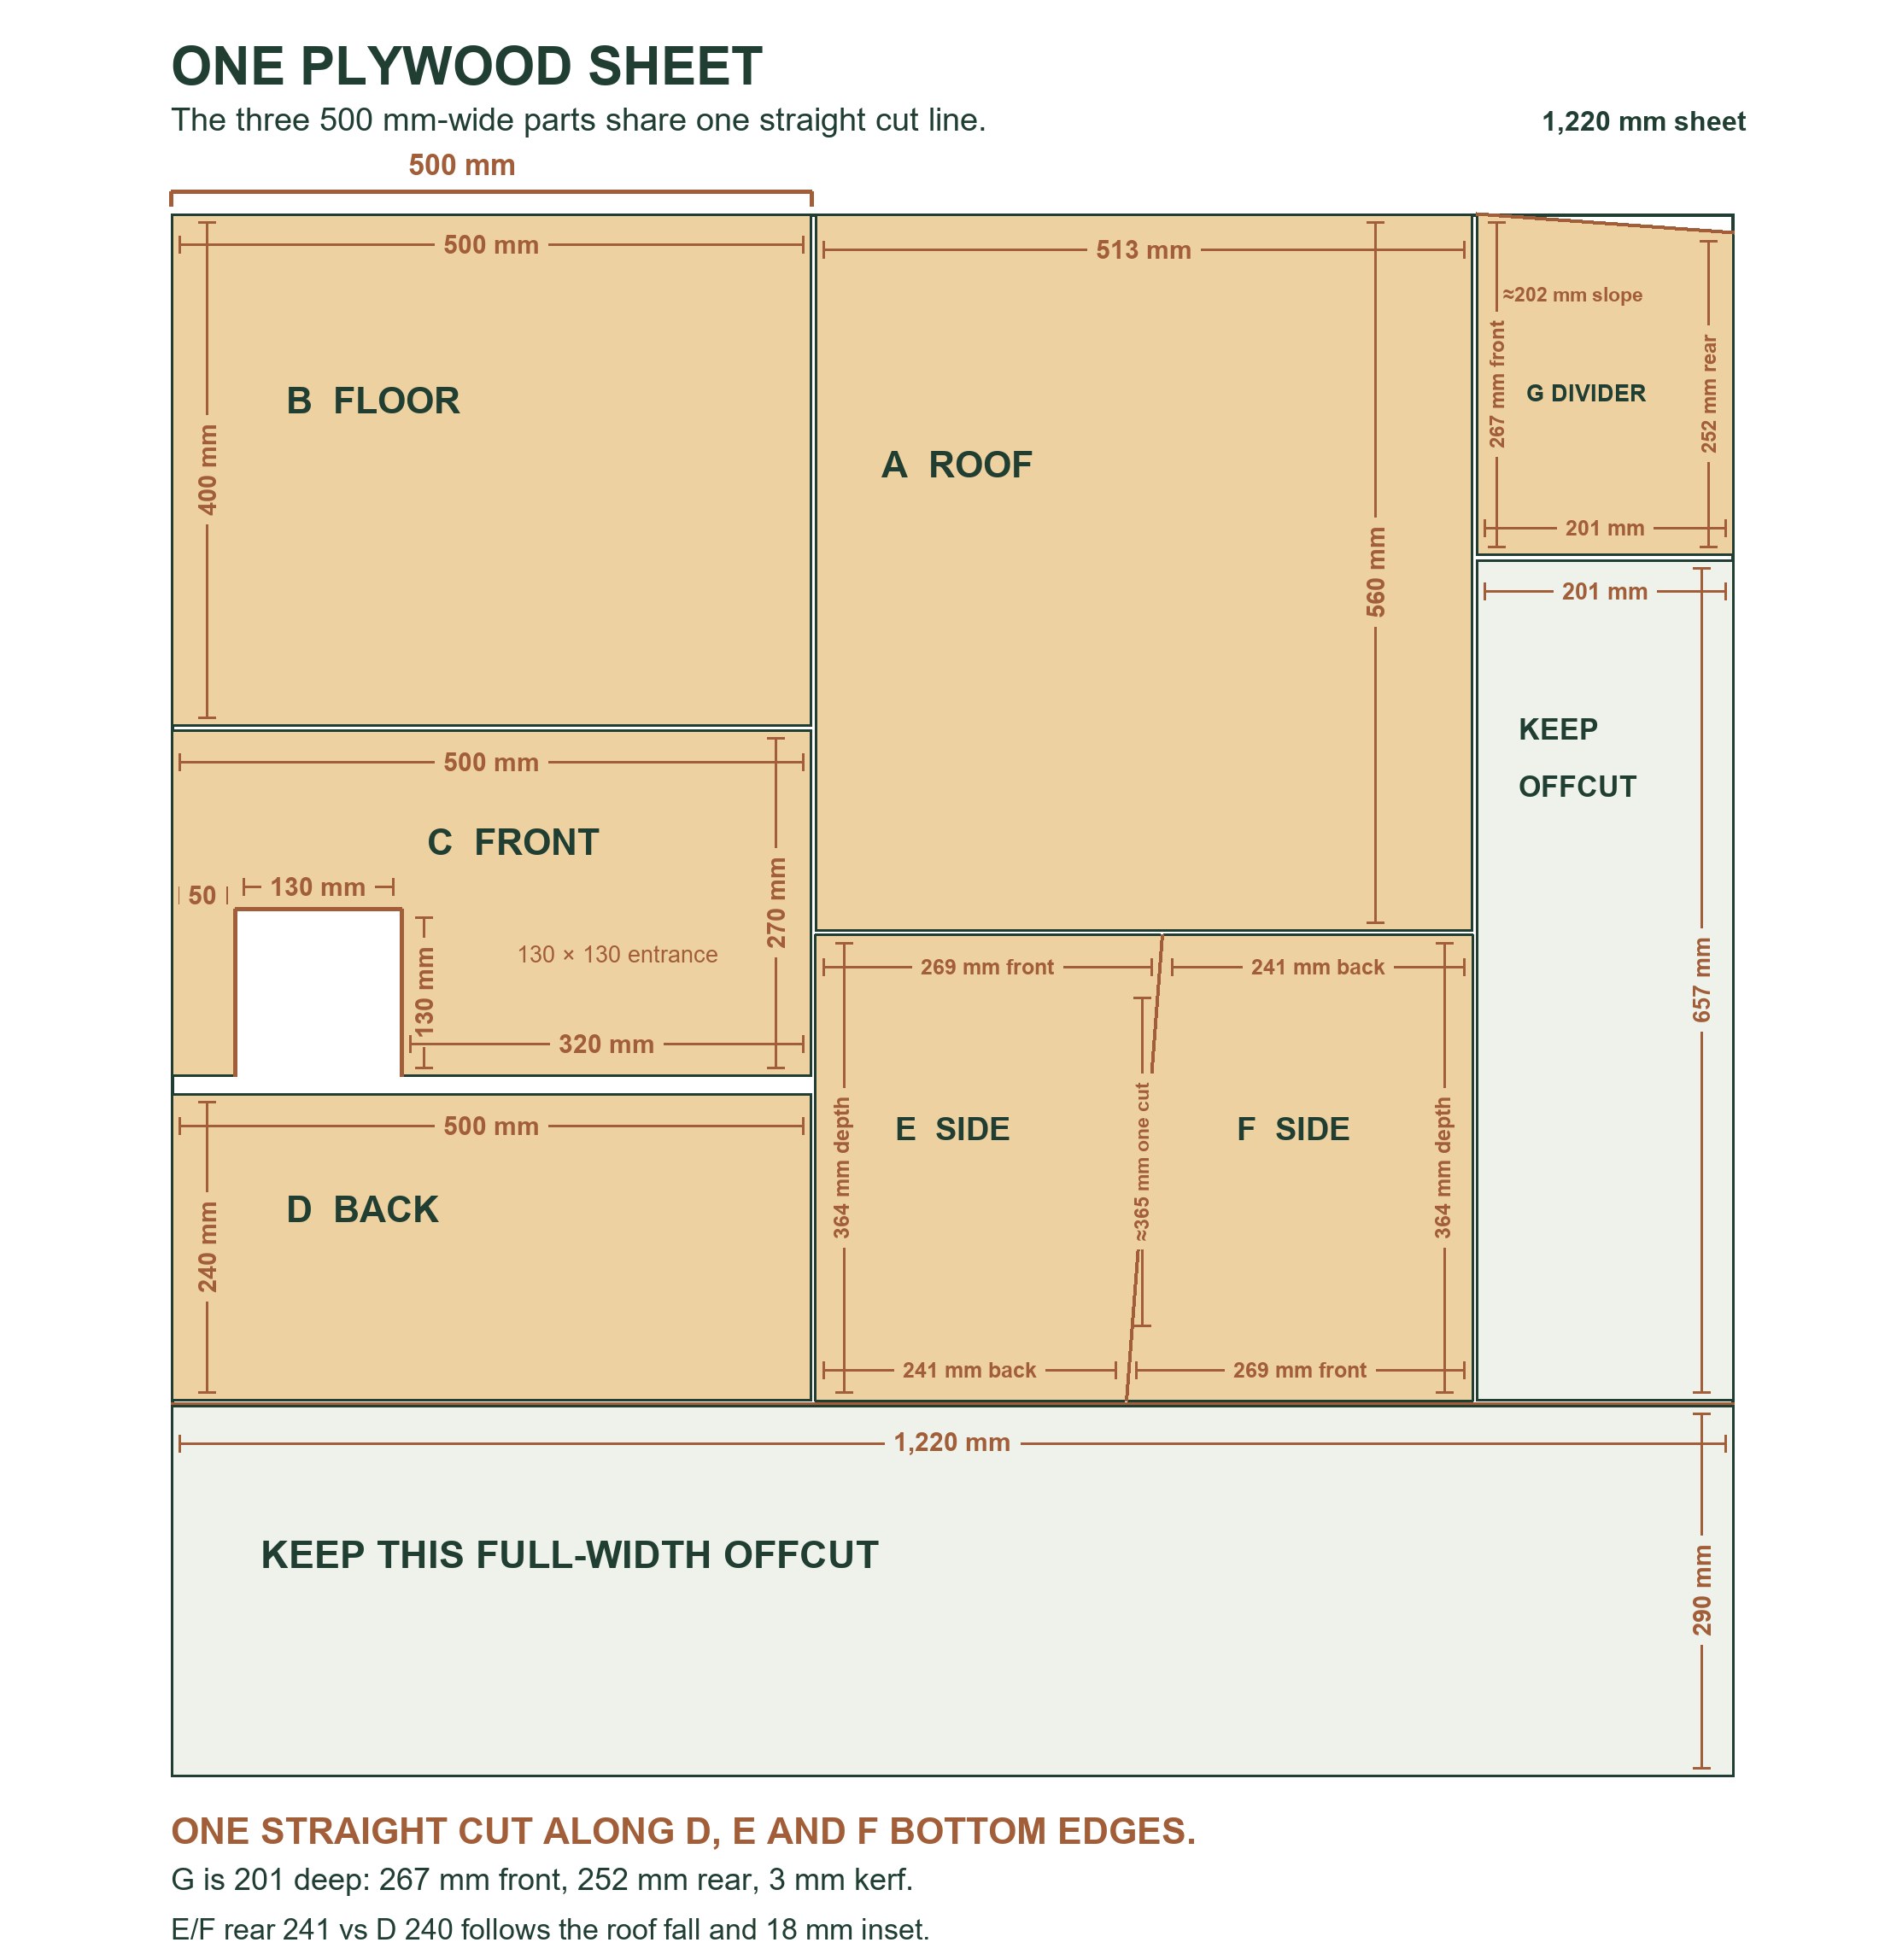
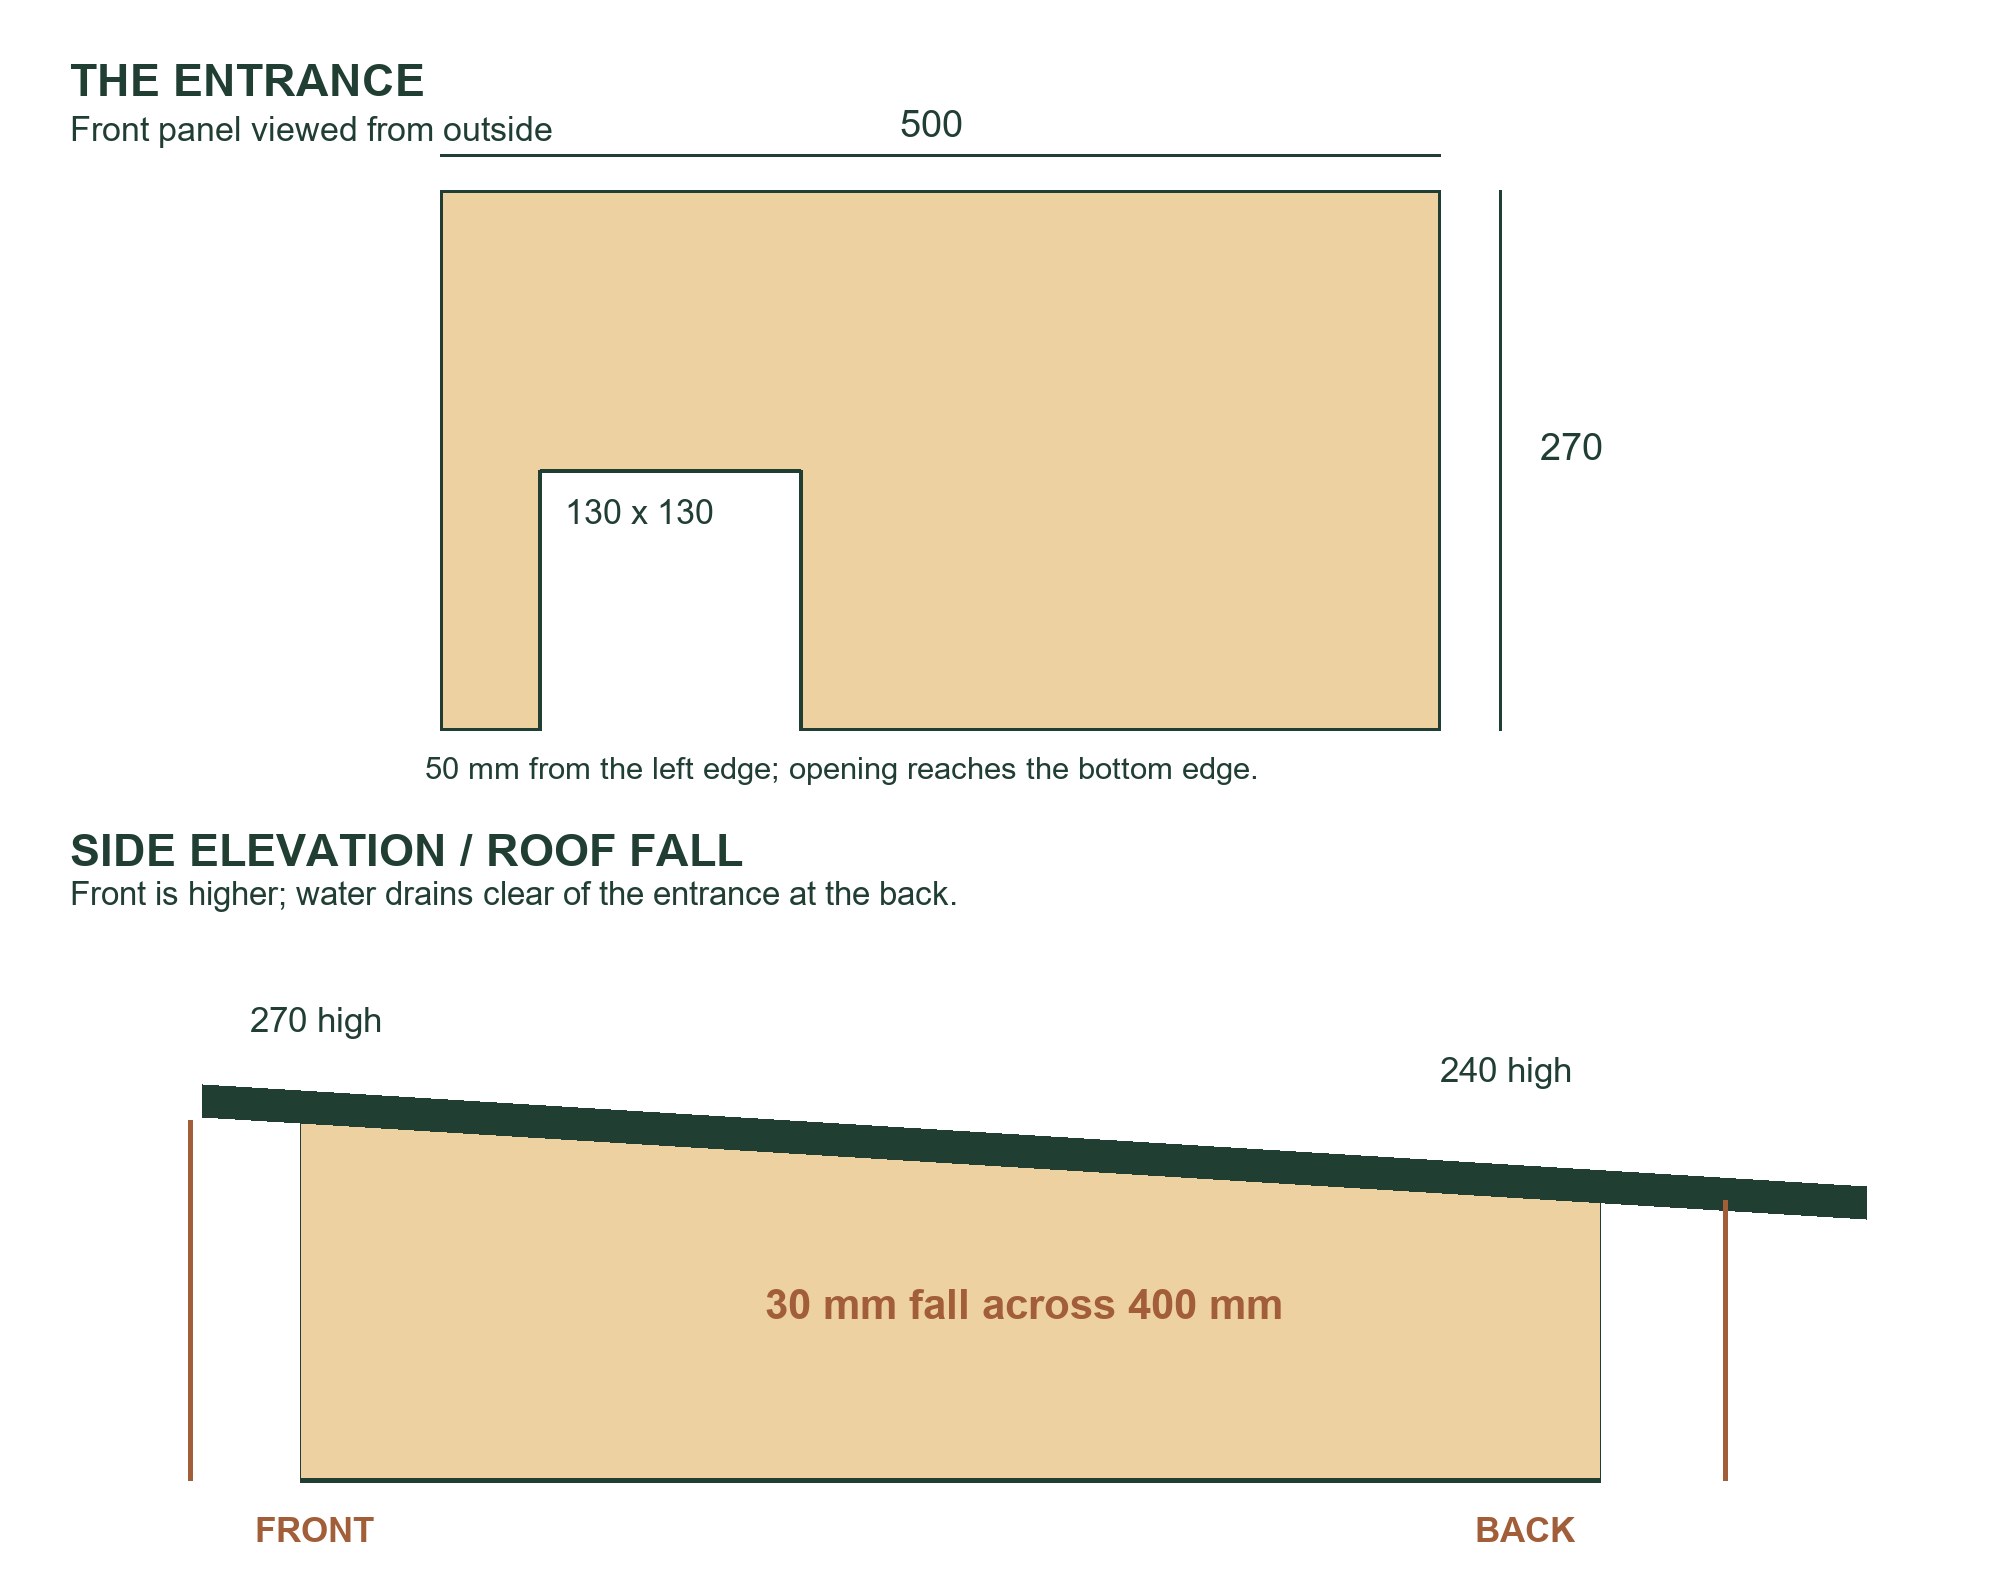
From one 1,220 × 1,220 × 18 mm sheet, cut a 560 × 513 mm roof (A) and a 500 × 400 mm floor (B). The 500 mm wide front (C) is 270 mm high; the back (D) is 240 mm high. Cut the two 364 mm deep sides (E and F) to 269 mm at the front and 241 mm at the back. The 201 mm deep divider (G) is 267 mm high at the front and 252 mm at the rear. Cut two 364 × 30 mm base runners (H) and two 270 × 20 mm lid stops (J) from the retained offcut. The front entrance is 130 × 130 mm, starting 50 mm from the outside left edge and reaching the bottom edge.
The layout keeps B, C and D on one 500 mm wide strip. A sits beside B, and E and F share one sloping saw cut below the roof. Allow 3 mm for the blade; keep the 1,220 × 290 mm full-width offcut for H and J. Measure each finished part rather than scaling from the drawing.
How do the pieces go together?
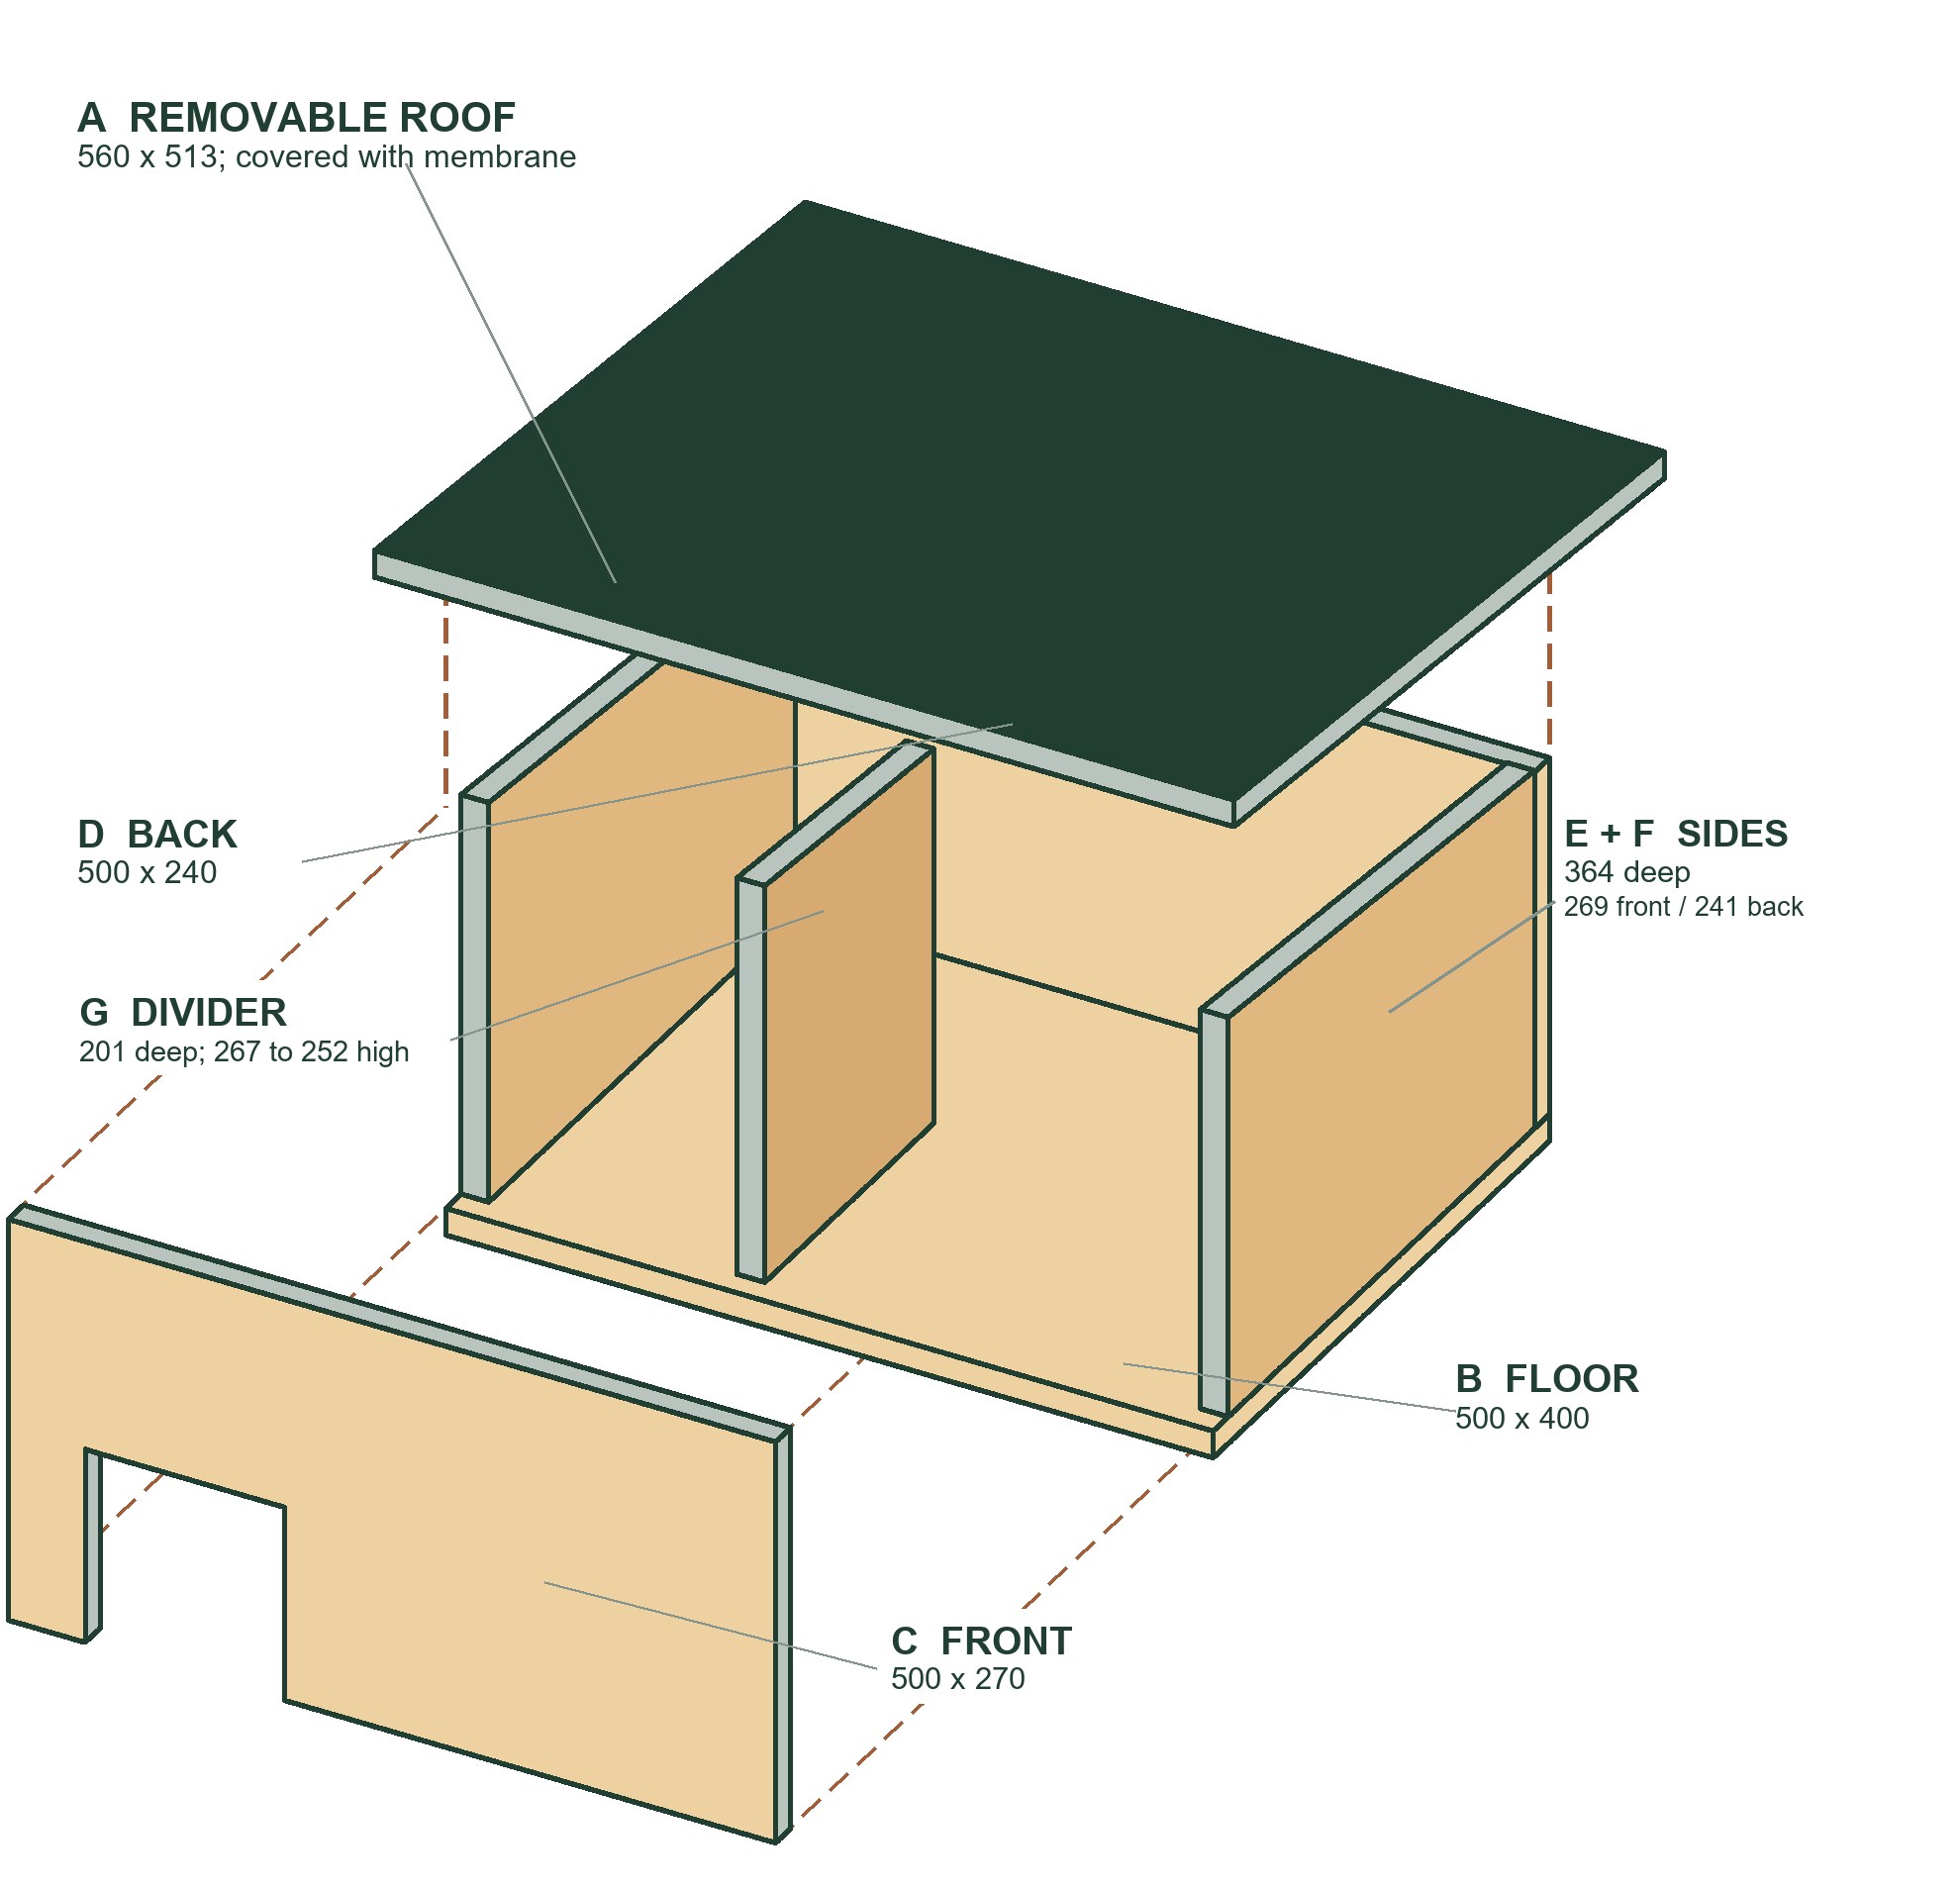
Cut and label the panels, marking front and back before sawing the side and divider slopes. Cut the 130 mm square entrance in C and smooth every edge. Drill pilot holes before fixing near plywood edges.
Stand E and F between C and D on the floor, with the high ends at the front and the outer faces flush. Check that the side tops make one continuous front-to-back slope. Pilot-drill and drive corner screws through C or D into each side’s 18 mm end, then fix the floor from underneath. Check that no screw tip projects inside.
Fix G against the inside of C, leaving 162 mm clear to the inside of the left wall. The 201 mm deep divider leaves about 163 mm behind its end for the route into the sleeping area; its sloping top leaves roughly 2 mm beneath the lid. Screw through C and B into G. Fit the two runners beneath the floor, running front to back.
Fit the vent in a side wall behind the sleeping area, below the roof overhang, with its outer end turned down. Centre the roof for about 30 mm overhang at each side and set it about 30 mm past the front. The 513 mm sloping depth leaves roughly 82 mm at the rear. Add a waterproof membrane with a rear drip edge, then fit the two stops beneath the roof, clear of G, and secure the removable lid with exterior catches.
Check the doorway position and the front-to-back roof fall against this elevation before fixing the lid:
Use the printable six-page guide for the full labelled layout, fastener and roof details before starting the build.
Where should the finished house go?
Choose a quiet, shaded, dry and sheltered spot with cover nearby. Face the doorway away from north and north-east winter winds, keep the entrance, side vent and rear drainage edge clear, and leave dry leaves nearby for nesting material. Put any food or water away from the sleeping house. The British Hedgehog Preservation Society recommends a solid house with a base and an entrance tunnel or internal baffle, and warns against creosote or non-water-based treatments. Untreated wood is the simplest choice; if you finish the outside, follow the product’s safety advice and allow it to cure completely.
Do not nail down the roof as you may want to clean the box in the future
Once installed, do not lift the lid to check for a resident. Clean only when you know the house is unoccupied; an apparently quiet entrance does not prove that. The BHPS suggests late March or early April after winter use as a possible cleaning period, subject to occupancy. Our guide explains the gentle hot-water cleaning method. If you are preparing the garden for winter, read when UK hedgehogs hibernate and how to protect their nests.
Our design is a printable construction plan, not a claim that this exact box has been tested with resident hedgehogs. Watch the site from a distance and let any visitor choose whether to use it.
Sources & further reading
- Hedgehog Street. “Hedgehog homes”, checked 4 October 2026 — Read source
- British Hedgehog Preservation Society. “Hedgehog Homes”, checked 4 October 2026 — Read source